This is the process I went through to upgrade my phone from II5 to the Galaxo ROM. This is for my information only. If you follow this and turn your phone into a paperweight, I don’t care.
Thanks to kam187 on androidforums.com for the bulk of the knowledge and the guys at hdblog.it for the ROM.
Before doing any of this, you need to upgrade your phone’s firmware to II5 first.
You need to have the sdk tools on your computer:
– Extract the android-sdk-windows-1.5_r3.rar files to a folder on your computer.
– Copy recovery.img from the 0.42 Recovery Image over the existing recovery.img in the tools – Copy folder.
You probably need to install the adb usb driver at this point, if you haven’t done this before, otherwise the phone won’t respond to command line actions:
– Turn on USB Debugging on the phone: Settings > Applications > Development > USB Debugging and wait for a prompt to install a driver.
– Install the correct adb driver from the usb_driver folder.
– For more information on the adb usb driver, see this post.
From kam187, the key things are:
– Never boot II5 after a wipe and BEFORE applying update.zip
– Never boot after update.zip without G.Apps restored
Copy the 0.42 Recovery Image and Galaxo ROM and the II5.tar to the phone:
– Connect the phone to the PC (use the factory cable, Rastaman-FB had issues with a non-Samsung cable) and mount the internal storage using the USB Connected button that appears in the Notification Bar, then Mount.
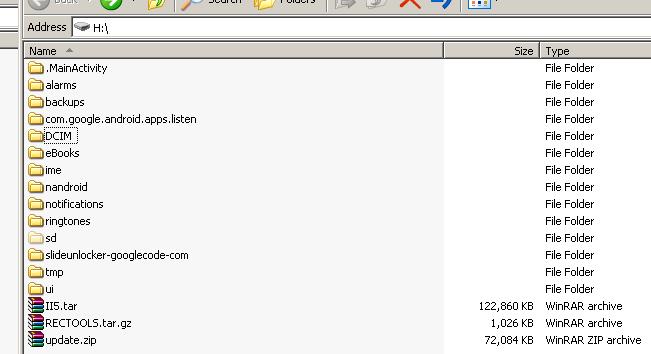
– Copy rectools.tar.gz (from the 0.42 Recovery Image) to the root of the internal storage.
– Copy the update.zip (from the Galaxo ROM) to the root of the internal storage.
– Find the II5 firmware I7500XXII5-PDA-CL64494-REV5(VIA).tar and rename it to II5.tar and copy this to the root of the internal storage (this is how the Google Apps are restored later). Your internal phone storage should look a bit like this..

– Switch off the phone.
– Boot into fastboot mode by holding the Call button (bottom left) whilst powering on the phone with the Power button (bottom right). The phone should appear to be waiting..
– In Windows, go Start > Run and type cmd then press OK to open the DOS command prompt.
– Navigate into the Android SDK tools folder where adb.exe and fastboot.exe are located (On my machine it is: C:Androidandroid-sdk-windows-1.5_r3tools – Copy since I was using kam187’s repacked 1.5 SDK). Basically you need to type something like cdandroidandroid-sdk-windows-1.5_r3tools to get to the directory beneath where you have extracted android-sdk-windows-1.5_r3.rar or android-sdk-windows-1.6_r1.zip.
– Now, in this folder type: fastboot flash recovery recovery.img
– Once this is complete, pull out the phone’s battery and reinsert it to leave fastboot mode.
Now we boot into the 0.42 Recovery image:
– Reboot the phone in Recovery Mode by holding the Volume Down and Call buttons whilst pressing Power to power up the phone.
– You should see a green 0.42 Recovery Console screen like this

– Choose Nandroid backup to make a complete backup of your system.
– Choose Wipe data/factory reset to clear your phone and reboot into Recovery automatically.
– Choose Apply sdcard:update.zip to apply the Galaxo ROM and reboot into Recovery automatically.
– Choose Restore G.Apps to restore the Google Apps that were automatically backed up (you must have copied the II5.tar file to your phone).
– Reboot into a lovely new ROM!
If your phone hangs (like mine did) at the loading screen – did you remember to restore the Google Apps?
Galaxo ROM: http://forum.hdblog.it/showthread.php?t=4842
0.42 Recovery Image: http://forum.hdblog.it/showthread.php?t=3995
ROM Video: http://www.youtube.com/watch?v=0a-swBMfys8


